

This post is part 3 of a multi-part series. It provides parents with everything you need to know to make it easier to move your freshman kid to college. It was developed by a rising senior at the University of Tennessee and her mom (founder of That’s So Perfect! Lori Parsons). We revisited our freshman move-in experience, including the successes, the mistakes, and the complete surprises. Then, we added new knowledge from numerous books and online resources. This series also incorporates input from experienced parents who shared what they wish they knew back when they moved their kids to college. We’ve consolidated all of this knowledge into a set of easy-to-follow guides for you and your student.
After reading the series, you’ll know how to prepare yourself and your student for a successful move to college, including everything from financial readiness and personal safety to what to buy for the dorm or apartment and how to pack efficiently. We’ve done all of the college move-in planning, the list-making and the organizing for you. As a cherry on top, we’ve curated a collection of the most recommended dorm-life products from which you can shop.
Here is an outline of the topics you will find in this post:
Take a deep breath and relax. With our help, you will feel confident that you and your student can plan and execute a successful move to college!
Read on, lovelies!
15 Things Every Parent Should Do Right Now To Make Moving Your Kid To College Easier For Both Of You
1. Before you start shopping, download TSP’s Shopping & Packing Tracker to keep you and your student organized around the purchases you’ve made, what you’ve packed, and what you don’t need because the school or roommate will provide it. Once you’re ready to shop, make sure you fill in the tracker as you go and update it as items change “status.”

Trust us on this one! There will come a point at which your staging area is a hot mess and you’ve been panic-buying. You’ll realize you have no idea what you still need to buy or what you’ve already packed in a bin to be loaded in the car. USE OUR LIST! It will keep you sane. Our list will also prevent you from arriving at campus and realizing you forgot your student’s mattress topper, sheets and their driver’s license! AACK!

2. Begin shopping by visiting our curated store filled with our recommended products. We’ve set up two stores for you – one for college girls and one for college guys. You can access them here:


3. Set your student up with a checking and savings account if they don’t already have one. Determine the monthly budget your student will be allowed to spend on groceries, school supplies, entertainment, etc. Review the budget with your student. Show them how to use a budget tracker and how to check their account online or via the banking app. I’ve include some of my own tips for making the money-management part easier below. For additional insights, I recommend you read Haven Life’s blog called “What Parents Of New College Students Should Know About Money.”
HOW TO MAKE MONEY MANAGEMENT EASIER: When choosing a bank for your student, I recommend going with the bank where you already have an account. This makes transferring of money between accounts instant for most banks since it’s an internal transaction. My daughter agreed to link her account to mine in the online portal (done by the bank at the time you’re signing up for a student account). I can see her account and transfer money to her but she can’t see or access my accounts.
CONSISTENTLY & FREQUENTLY COACH YOUR STUDENT ABOUT HOW TO MANAGE THEIR BUDGET: Another benefit of having your account linked with your student is that you can peek at her spending and coach her real-time on how to make better choices with her budget. At the end of each semester, we export a budget file from her checking account. Most banking apps have this feature. The app automatically categorizes expenses based on the store or other keywords in the purchase transaction. We go over this file together so she can see where her money went. My daughter quickly admitted that seeing the total sum of the amount she spent on having food delivered to her apartment, etc. was a major eye opener. She realized that when she’s making a purchase in the moment, $20 here or $20 there didn’t seem like a big deal. However, seeing it all added up and categorized quickly made her aware of how wasteful she had been.
DON’T assume your student will make good spending decisions. Peek at their checking account frequently. Coach them real-time on how to better manage their budget. Whether you’re footing the bill or they are, helping them become smart money managers is as critical as teaching them to be law-abiding citizens. It’s your duty as a parent, IMHO.
4. Teach your student how to write a check. I can hear you laughing from where I sit. I bet you think this is one of those things your kid learned in high school personal finance class. Am I right? Guess what – they probably didn’t. When we were moving my college daughter into her apartment as a sophomore, I had to show her roommate how to write the deposit check to the apartment complex. Her dad had given her a blank check, but she had never written one out before. Oh, and while you’re at it, please teach them how to: address and mail an envelope via USPS; read a paper map for when their cell phone dies or has no signal; and how to read an analog clock. Just take my word for it, these are things that schools no longer teach kids to do.

5. Set up a back-up / emergency credit card. Now is an EXCELLENT time to begin establishing a credit history for your student. You can do this in one of two ways: (1) Add them as an authorized user to your credit card account; or (2) Get them a secured credit card of their own. Make sure you have access. Coach them real-time on their spending and make extra sure they don’t run up ridiculous amounts on their card. DON’T ASSUME they learned the importance of a good credit score or how to manage credit while they were in high school.

CREATE A SIMPLE ROUTINE THAT TEACHES THEM HOW TO USE A CREDIT CARD RESPONSIBLY WHILE BUILDING A CREDIT HISTORY. Although adding them to your credit card account is an option, I recommend getting your student their own card with a low limit. When it’s in their name only, they tend to be a bit more careful. You may have to pay to secure it if they have no history at all. Make it part of their normal process to use the card to buy a specific item or category of items while they’re at school. For instance, tell them to always buy their groceries on the card, or their gas. Immediately after they pay for the food with the credit card, make them get into the habit of pulling up the app on their phone and sending a payment to the credit card from their checking account for the exact amount they just purchased. They should get in the habit of making the payment right there on the spot. Set some boundaries on their spending or only get them a card with a low limit to be safe. If they get in the habit of paying it immediately then they’ll build a good credit history quickly. Just as important, it will minimize the risk of letting the balance pile up and become an unpayable debt. This should also become part of your end-of-semester budget review with your student. It’s important to make sure they’re managing the card properly. If you’d like more info on this topic, Investopedia is one of my go-to resources on this topic, I recommend you read their article “How To Build Credit As A College Student Or Young Adult.”
6. Make sure you know how to access the money in your 529 plan and how to disburse it to cover expenses. I’ve seen plenty of panicked posts by parents who needed to pay tuition but didn’t realize their 529 disbursement process can take 7-10 days to settle. I’ve seen this leave parents without a way to pay tuition on time, which can be scary! Most universities will cancel the student’s class schedule automatically if you miss the tuition deadline.

There are a lot of rules and processes around 529 plans that must be followed. Review your 529-Plan or other college savings account withdrawal / disbursement process with the plan administrator. There is typically a process for setting up your withdrawals (your account info, or the school’s account info, etc.) This can take time to configure and be validated between banks. You definitely don’t want to do this at the last minute and risk missing the tuition payment deadline. I also strongly encourage you to review the rules of what is allowed to be reimbursed with your tax accountant. The IRS is very specific about what is allowed. I’m covering enough here so you know what questions to ask your plan administrator or financial planner. There’s so much more to learn, though. I encourage you to check out more in-depth advice over on Saving For College website. I’ve found their content to be super useful.
ACCESSING THE MONEY IN YOUR 529 PLAN: Remember that 529 plans are investment accounts. The cash is NOT sitting in a vault, ready for you to withdraw within a few minutes. To withdraw funds, you have to sell shares of whatever stocks and bonds your plan is invested. This is how they are converted to cash. The proceeds from that sale have to settle into your 529 plan’s brokerage account before you can remove that cash amount from your account. Depending on what day of the week and what time of day you make the request, the transaction that sells the shares could happen same day or it could take 2 – 3ish days. Then it may take a day or two for the cash to settle (“clear”) into the 529 account. Most 529 plan administrators allow you to make a request to withdraw funds by using their website, contacting their call center, or mailing in a form via USPS. Regardless of which method you choose, you’ll need to be prepared to instruct the broker which shares you want to sell and how many. You should calculate this so that your sale generates the amount of $ you need to pay allowable expenses. The broker cannot make this decision for you, so be prepared before you call the broker. Again, each plan may have its own process for requesting funds and then disbursing them. Check with your plan’s administrator to understand how your plan works.
DISBURSING THE MONEY FROM YOUR PLAN TO THE SCHOOL OR YOUR OWN ACCOUNT: When you make the request to withdraw funds (covered above), you have to tell the 529 administrator (usually a broker) WHERE to send the money you are requesting. Typically, you can have it sent to one of your personal bank accounts, to the beneficiary (usually your student), to the school bursar directly, or to some other third party. To do this, you will need to know the account information of the destination account. You’ll have to provide it at the same time you’re making the request to sell shares and withdraw funds. BEWARE: There are a lot of variables here that can slow down the process. In some cases, it might take a more than a week to reach its destination. PLAN AHEAD and make the request early enough to avoid missing your student’s tuition deadline. Check with you plan administrator well in advance of when you’ll need the money so they can explain the different timelines to you.
KNOW THE IRS RULES ABOUT WHICH EXPENSE TYPES ARE ALLOWED TO BE REIMBURSED WITH YOUR 529 MONEY AND KEEP RECEIPTS AND RECORDS! If you don’t want to end up in trouble with Uncle Sam, make sure you know all of the IRS rules. When you withdraw the money from the plan (covered above), no one will ask you what you’re going to spend it on. The broker doesn’t care. That happens later, during tax filing season. Just like your payroll taxes and documentation, your 529 plan administrator will send tax documents to you in January showing that you withdrew funds. The IRS expects you to claim those amounts on your taxes when you file that upcoming April. If audited by the IRS, you’ll be required to prove what you spent the 529 money on, and that it was a covered expense per IRS rules. NOT EVERYTHING IS AN ALLOWABLE 529 EXPENSE! In general, qualified higher education expenses include costs for tuition, fees, room and board, books, computers. There are rules around how much you can reimburse for housing. Each college publishes the standard cost structure that you must use when determining the allowable amount. Lastly, you can only withdraw from your 529 during the same year that the reimbursable expense was incurred! I am NOT a tax accountant. I recommend that you speak to your tax / financial advisor and your 529 plan administrator to become well-versed in the rules before you risk spending the money on an item that isn’t allowed.
7. If your student has a scholarship or financial aid, ensure you have a thorough understanding of how it will be distributed, when, and what you have to do (if anything) to request or access it. Like the 529 plan discussed above, make sure you understand this well ahead of the tuition deadline. Always assume everything takes longer than you believe it should. That’s a pretty safe rule for everything related to college!
8. Verify with your health insurance companies (medical, dental, vision and prescription) that your student is covered while they’re at school. Be sure they can access covered care wherever they are – especially if they are out of state. We have one of the top three health insurance providers so this wasn’t an issue for us, even though my daughter attends a school in a state other than the one we live in.

I’m in a lot of college parent groups on social media and frequently see parents complain about their health insurance coverage for their students who are out of state. This isn’t something you want to leave until the last minute. If your student is calling you from the emergency room because they stepped on a broken bottle and cut their foot open, you don’t want to worry if they have insurance coverage.
SEND YOUR STUDENT TO SCHOOL WITH THEIR OFFICIAL COPY OF HEALTH INSURANCE CARDS, NOT ONE THAT YOU PRINTED OUT FROM HOME. Speaking from experience, some places refuse to accept the “print your own” insurance cards, despite your insurance company telling you that the home-printed version is accepted everywhere. Go to your health insurance website right now and request that they send you an official card(s). It can take a week or more sometimes for these to arrive to you. Be sure to give yourself enough time so you can send your kid to school with a real card.
9. Call your homeowner’s insurance company to verify they will cover your student’s belongings, etc. while they’re at school, especially if they’re out of state. This can be a bigger issue than health coverage, and almost definitely will be an issue if your student is attending school in a different state. If your student is in-state, your insurance broker may still recommend that you add a supplemental policy to your homeowner’s coverage to close any gaps that might occur in a dorm or at an apartment that isn’t your primary residence. In the out-of-state scenario, many insurance companies maintain separate legal entities for each state in which they’re licensed to provide coverage. Others may not provide any coverage at all in certain states. This may mean you are required to get a completely separate policy just to cover your student while they’re at school. In that case, you may have to source it from an insurance company located IN THE STATE WHERE THE STUDENT IS ATTENDING SCHOOL.
IF YOUR STUDENT IS MOVING INTO AN APARTMENT INSTEAD OF A DORM, INSURANCE IS REQUIRED BY THE APARTMENT COMPLEX FOR SPECIFIC AMOUNTS. This is usually the case for all apartment or rented homes, especially in college communities. The landlord assumes college students are irresponsible and destructive. Most leases will require proof of renters insurance and they’ll usually specify what they want the minimum amount of liability coverage must be. The policies are typically affordable ($25 – $75/mo). Again, this isn’t something you want to leave until the last minute to secure, or forget to include in your budget.
- Uploading required immunization records to university portal
- Submitting photo and activating their student ID digital card
- Purchase their parking permit and know which parking areas they’re allowed to use. Using a campus map, identify which lots are commuter / non-commuter and therefore where they can park. Use the campus map to orient them. Parking tickets add up!
- Dining Halls: Use the campus map and the website to the university food services website to help your student figure out where they can eat on campus. Help them find the menus and hours of operations. They will also need to understand how many meals per day are they allotted for their dining plan. Many students don’t know when dining halls are open on weekends or what time they close on weekday evenings, leaving them hungry and grouchy. You don’t want them to spend extra money on Uber Eats out of frustration! Also have your student review HOW they are supposed to pay for their dining hall meals. Many schools require students to use a single school app on their phones that’s tied to their school ID / account. If they have a dining plan, it may swipe from the app. I see a lot of parental and student confusion about this even several weeks into the school year in the social media groups that I’m in.
- School apps for mobile: At this point, most schools use apps that give students info on services around campus and even allow them to schedule appointments or make requests. There are apps for everything from access to libraries, campus maps, student account balances, grades, dining hall menus and schedules, class or teaching schedules, campus calendar, sports, special events and more! Your student needs to know where to find the apps and how to use them, ideally before they arrive on campus.
11. Clear out a space in your home to be the “holding area” for items you buy for moving in, and eventually you will turn into the packing “staging area.” To stay sane, I recommend choosing an area that you don’t have to walk through every day. This might be a corner of the basement or a dining room that has doors you can close. The staging area can be a chaotic zone, and stuff can really start to pile up. As soon as you buy an item, put it in the staging area straight from your car. Use our tracker to keep up with what you’ve bought, what you’ve ordered, what you still need and what you’ve packed. If you don’t do this, you’ll lose track of items around the house and end up buying multiples or forgetting to pack an essential item. Later when you pack, it’ll be easier to judge what size boxes you need because you can “see” all of the items to be moved. Check out our 90-second video that shows you the steps for a mind-blowing packing hack to ensure everything fits in your vehicle.
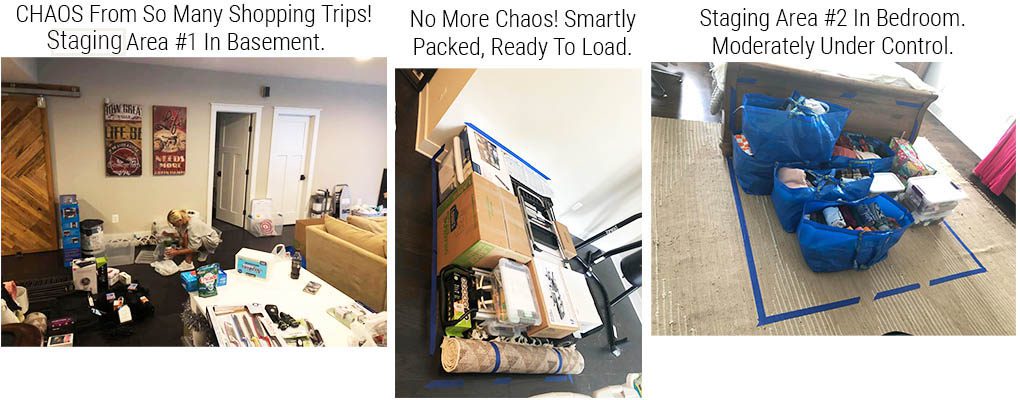
12. Start buying a variety of sizes of rubbermaid storage bins (clear, with locking lids) and the giant blue, heavy duty zipper duffel bags for moving (or any color). If you buy them a few at a time it won’t feel so painful on your checking account.
I recommend buying a variety of sizes, but stick with the same brand if you can because it makes stacking and lid-matching easier. You may find that you need to leave a few of the bins at the dorm with your student so they have a way to store items under their bed or in their closet. My favorite is Rubbermaid Brand’s Clever Store clear storage containers because they have locking lids, they’re super sturdy for heavy items, and you can see everything inside. Here are links to Amazon (affiliate) with my preferred sizes, listed largest to smallest below:



13. Purchase a multi-configuration, folding dolly / hand-truck and a folding beach cart – trust me! These two items saves us TONS of time and definitely saved our backs from breaking. You may end up having to park far away from the dorm. Even if you’re close, it can be a lot of stuff to carry when you can only haul one box in your arms at a time. Your student’s school may claim they’ll have luggage carts available on move-in day, but I can pretty much guarantee they’ll all be in use by one of the other hundreds or thousands of freshman moving in at the same time as you. You’ll need them when you move your student out, and again when you move them into an apartment. They’re handy around your own house – hauling mulch around the yard, moving furniture, etc.

14. Plan the logistics ahead of time for your move-in day arrival on campus in as much detail as possible. Housing departments often have very specific logistical instructions for student move-in day. They may designate a certain window of time and / or a special parking area on campus. They likely have detailed requirements for what is needed for your student to check-in upon arrival (documentation, ID, etc.). Make sure your student is checking their student email frequently and sharing these details with you for planning purposes. Review the campus map to familiarize yourself with where the dorm and designated parking areas are located. Leaving these details until the night before or the morning of moving day will only serve to stress everyone out even further.
15. Last but not least – this one is a doozy so brace yourself……Ask your student how much they want you to be involved in the actual move-in once you get to the dorm, and how long they want you to stick around after moving is done. This is one of those unexpected pieces of advice that experienced parents will give newbie parents of college students. Many parents have a whole vision in their mind of helping their student unpack, wash and fold every clothing item and of hanging up ever poster during move-in day. Then they want to take their student out to dinner and walk around campus together. Some parents even plan to spend the night nearby and stop by the next day to say bye before leaving campus.
I’m so sorry to break the news to you, but your student may not want you to do any of those things. Ask them what they want, or what would make them most comfortable. If your student says they want you to unload stuff from the car and then get right back in the car and drive home immediately, tell them you will honor their request. Please try not to be heartbroken by that response. Recognize that it may be that your student is nervous and emotionally overwhelmed. They may be afraid that if you stick around on move-in day, it might cause them to “chicken-out” and ask you to take them back home. They might be afraid everyone will stand around crying the whole day. The third possibility is that your student is excited about being at school and on their own and they’re eager to prove that they’ve got this under control. None of these answers mean your student doesn’t love you or need you. It just means they’re trying to emotionally prepare themselves and minimize the tears, panic and awkwardness. Respect their wishes. You can cry the whole way home in the car. My husband and I both cried for the 7 hour drive home. And then I cried again when I stepped into the house.
Whew! I know this is a lot to absorb. Read through a few times. Make yourself a list of questions and drop them below in the comment field or on our social media. We’re happy to answer! Chin up, mommas – YOU GOT THIS!
Now go back and read parts 1 & 2 in the series to make sure you have your t’s crossed and your i’s dotted. Here’s a recap of the great info you’ll find in the other posts in this multi-part series designed to ensure you and your student have a successful college move-in day:
- Part 1: 7 Things You Should Do In The 4 – 6 Months Before College Move-In. This post covers everything you need to know about long lead-times or deadlines like setting up school accounts, searching for a roommate, orientation, sources for school / dorm information and how to connect with other parents at your university. In Part 1, we also teach you about the critical life skills necessary for your student to successfully live on their own. You’ll learn about legal preparation required for emergencies such as authorized access to your student’s university accounts, power of attorney for access to checking and credit accounts, and medical directives. These legal documents will allow you to make medical decisions if your student is unable to do so for him/her/themselves. Without these things in place, you and your student may find it difficult to navigate their freshman semester.
- Part 2: 8 Things You Should Do In the 2 – 3 Months Before College Move-In. Part 2 provides insights and tips for topics such as: dorm and roommate selection, class registration, signing up for classes, tuition-saving tips, and how to stay safe on a college / trade school campus. You’ll also find a shopping list with links to our favorite items for dorm and college life. You can click to buy straight from the list!
Cheers, lovelies!


